GBA Graphics Editor
GBA Graphics Editor, or GBAGE, is the gold standard for viewing images within a ROM. Easy to use and very powerful, this tool by Nintenlord is going to be your best friend. Go ahead and download it if you have not already, and run the application.
 This is GBAGE's main window. Here is a breakdown of its functions:
File - Standard file opening and saving.
Open ROM - Opens a specified ROM.
Load a .nlz file - Loads a special file containing compressed graphics and offsets.
Load a palette file - Loads a .pal file created by VBA.
Re Scan - Scans through the ROM again and updates .nlz files.
Deep Scan - *Performs a scan that can pick up things that are less likely
to be graphics.*
Save - Saves the current ROM.
Save As - Saves the current ROM into a new file.
Exit - Exit the program.
After opening a ROM, you gain access to the Windows and Rotate/flip image tabs.
Windows - Open other windows for specialized functions.
Image Control - Window for viewing and changing images.
Palette Control - Window for viewing palette settings.
Colour Control - Window for editing colours within a palette.
Tile Control - Window for viewing and editing TSA.
Rotate/flip image - Choose to rotate or flip an image
Rotate - View an image rotated based on angle chosen.
Flip - View an image flipped either horizontally and/or vertically.
The File window has three unusual options--Re Scan, Deep Scan, and Load a .nlz file--that you may be unfamiliar with. When you open a ROM with GBAGE it scans the contents of the ROM for compressed images and saves their offsets and palettes to a special .nlz file. Re Scan looks through the ROM again and updates the .nlz file. Deep Scan picks up smaller data sets that are less likely to be images but still could be identified as a compressed image. Load a .nlz file loads a premade .nlz file.
Image Control
Go ahead and load up a ROM and open the Image Control window. 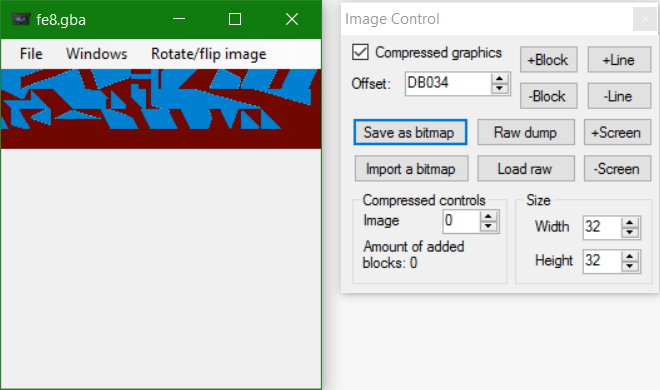
This is what the Image Control window looks like with a ROM opened. This window is the most important window, as it allows the user to look through the ROM's images. Once again, there are multiple options:
Compressed Graphics - Denotes whether an image is lz77 compressed or not.
Offset - Gives the position in the ROM that GBAGE is looking at.
+Block and -Block - Changes the viewed offset by 32 (0x20), which is one tile.
+Line and -Line - Changes the viewed offset by one row of tiles. See the size options for more information.
Save as bitmap - Saves the currently-viewed image in the chosen format. These formats are:
Bitmaps (.bmp)
Portable Network Graphics (.png)
Graphics Interchange Format (.gif)
Import a bitmap - Loads and inserts a graphic into the ROM. More info below.
Raw dump - Saves the currently-viewed image in the chosen raw format. More on this later. These formats are:
GBA files (.gba)
Binary files (.bin)
Load Raw - Loads and inserts a raw graphic into the ROM. Once again, details below.
+Screen and -Screen - Changes the viewed offset by one screen.
Compressed controls and Size - See their respective sections.
Compressed Graphics
GBAGE determines what is and is not an image by looking for a specific set of bytes at the beginning of a compressed image. When viewing a compressed image in GBAGE, the box denoting a compressed image is checked. When navigating images within a ROM, such as by pressing +Line or +Block, you may notice that the box becomes unchecked and the image turns into a jumbled mess. When you change the Offset, GBAGE is not seeing the image header, and does not know the image is compressed. For uncompressed images, such as item icons, the -Block and +Block options are useful.
Compressed Controls
The Image Control window has a box in its lower-left corner that has two things in it: Image and Amount of blocks added. When you open a ROM in GBAGE, it counts the number of images it finds, and assigns each one a number based on the order in which the images are found. In the image above, notice that the image box displays that the image in numbered "0". Use the up and down buttons to quickly navigate compressed images within the ROM. You can also enter a known image number into the box and hit enter to immediately go to that image. Deleting or adding images to the ROM may change these numbers, so be careful. Furthermore, this box only applies to compressed images. The Amount of blocks added note shows how many pixels or tiles needed to be added to the image to display a rectangle.
Size
This box on the Image Control window dictates how many tiles wide or tall to display the image. This setting is useful for images that may be seen in-game in a different format than how they are inserted. For example:
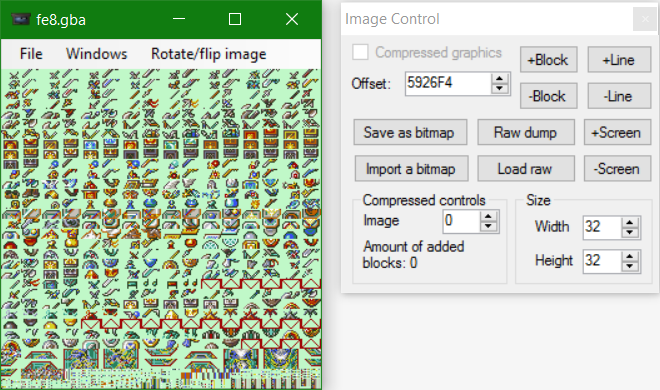
These weapon icons are a mess! How about we make them look a bit better?
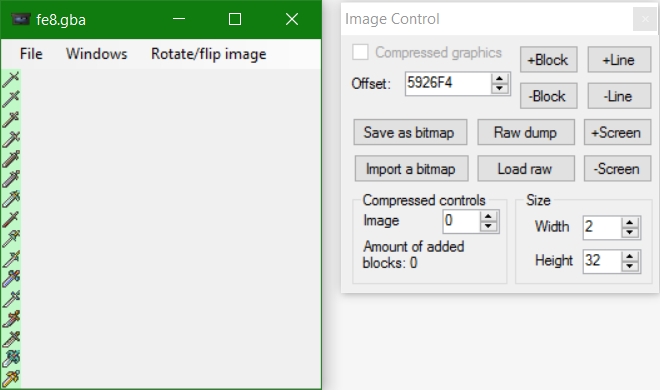
Much better! Now, using +Line twice will move to the next weapon icon. The best part about changing the size like this is that you can insert your icons as an image formatted vertically, like these icons.
Saving Graphics from GBAGE
GBAGE has two methods of saving graphics: Save as bitmap and Raw dump. Save as bitmap outputs files that are edited with conventional graphic editing tools, while Raw dump saves images as binary data. GBAGE is also slick because it outputs files using the specified palette and other settings.
Inserting Graphics with GBAGE
To insert graphics using GBAGE, select either Import a bitmap or Load raw, depending on what type of image you are inserting. Clicking Import a bitmap displays:
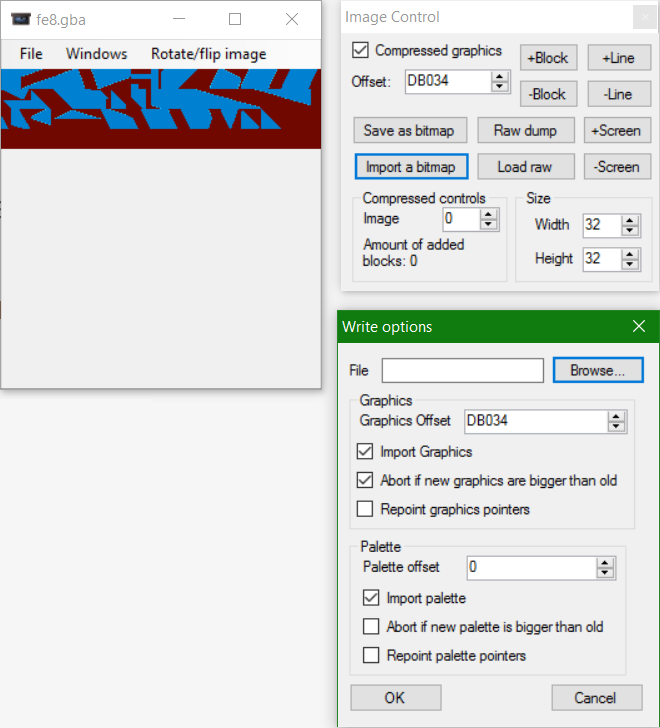
This window allows you to import .gif, .png, and .bmp images. The Graphics section is where you specify the offset to write to. You have the option of specifying whether or not to abort if the image is larger than what you are replacing, but that only matters if you are importing an image over an existing one. When inserting images into free space, uncheck the box. Also, there is an option to repoint existing pointers to the offset given by the Image Control window to point to the new graphic. When importing a graphic, having the Compressed graphics box checked will insert the graphic using lz77 compression. Leaving it unchecked will insert the graphic as uncompressed.
The Palette section is the same as the Graphics section, but for palettes. In many cases, this section is optional, such as when replacing graphics that use the same palette as the original. You could also choose to only import an image's palette without any graphics, if you so choose.
Load raw has a similar interface to the Graphics section of Import a bitmap and functions the same way.
Palette Control
Remember those weapon icons shown earlier? Navigating to them normally should give you something like this:
 Whoah! Definitely not what we want. Time to open up the Palette Control window.
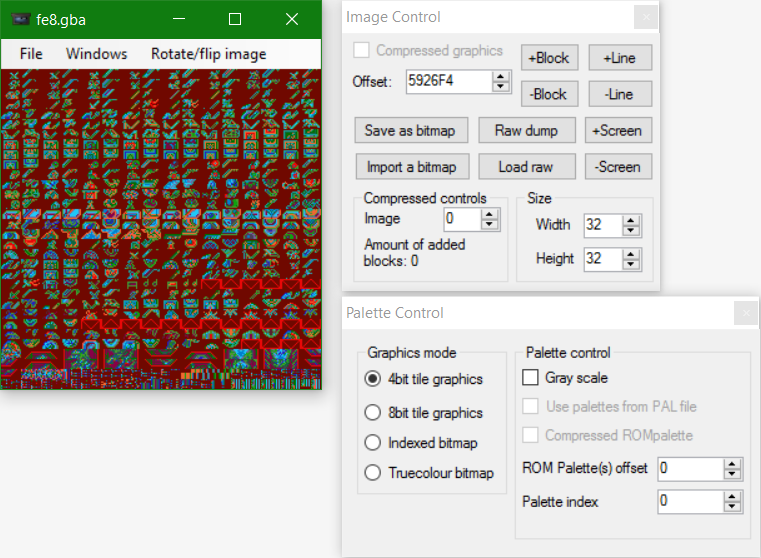
So, GBAGE does not know where the palette for these icons is by default. Just like the Image Control window, here is a breakdown of the features:
Graphics mode - This determines how colour data is saved. More on this later.
Gray scale - Display the image as a grayscale image. Useful for finding graphics with unknown palettes.
Use palettes from PAL file - If you load a .pal file, you can choose palettes from it.
Compressed ROMpalette - Just like compressed images, GBAGE can determine if the palette at the indicated offset seems to be compressed.
ROM Palette(s) offset - Location of the palette you want to display.
Palette index - Displays an alternate palette, which is the next 32 (0x20) bytes after the previous one.
Before explaining further, how about we set the correct palette?

Awesome. Let us keep rolling, shall we?
Graphics Mode
As indicated above, GBAGE can detect images with different colour depths. Most images encountered will use 4bit colour depth. One such exception is the rotating circle graphic in FE7's main menu. Colour depth describes how many bits are used to save colour information in an image. A 4bit image, or 4bbp (bits-per-pixel) uses a 16-colour palette. This is due to the 16 possible combinations of the four bits. For example:
Notice that the max is 15, but we count colour 0 in our palette. 8bit depth is where an entire byte is used to save a pixel's colour information, so there are
Counting 0, that gives an 8bit bitmap 256 colours to choose from.
Palette Index
Sometimes graphics will be able to use different palettes, such as map sprites or windows whose colour is determined by the options menu. Graphics like these have their palettes saved one after the other. Because they are predictably placed, we can advance to the next palette, or the one after that, and so on, quite easily. Since we have already discussed weapon icons, there is a good example of different using a different palette index just up ahead.
Continuing onward to the weapon rank icons, you may notice that they do not look quite right.

A quick change of palette index yields:
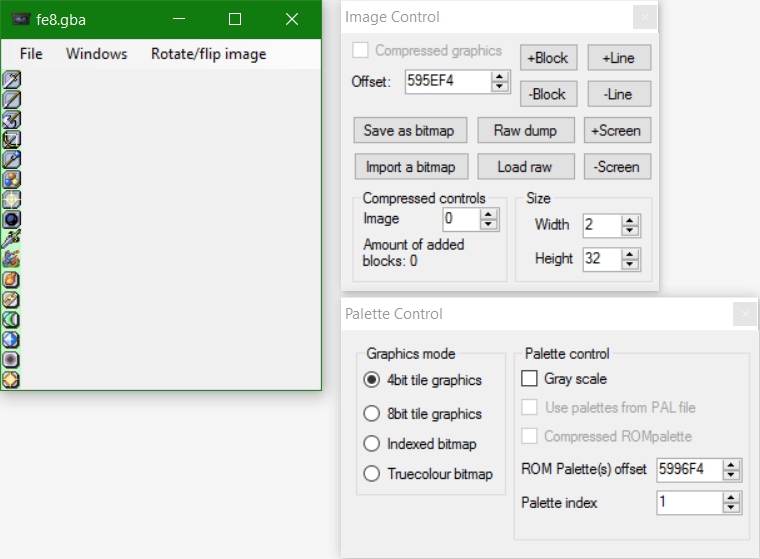
This leads us into the next window: Colour Control.
Colour Control
Opening the Colour Control window after changing the colour index, you should get something like:
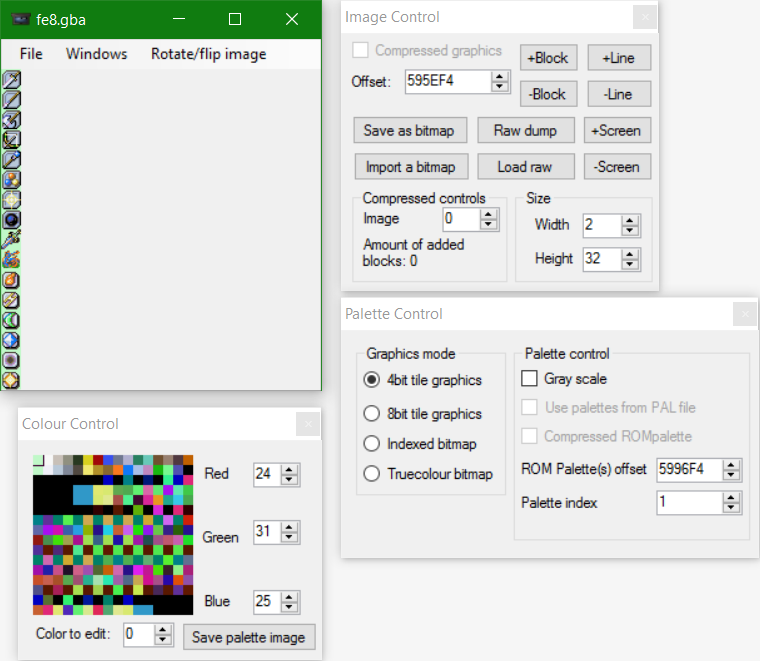
The Colour Control window is very simple. On the left, you have your palette indexes (numbered 0-15). At the top is the weapon icon palette (index 0), in this example, and just below it is the weapon rank palette (index 1). On the right, you have the red, green, and blue values for the selected colour. On the GBA, each of these is represented by 3 bits for a range of 0-31. To convert to normal colours, multiply these values by 8. Likewise, colours you use must be in steps of 8, converted into 0-31. On the bottom, you may choose which colour you want to edit the values of, but it is much easier to click on a colour instead. Lastly, you can save the palettes as a .png, .gif, or .bmp.
Finally, we have the most complex part of GBAGE!
Tile Control
Switching gears, let's look at an image that uses TSA.
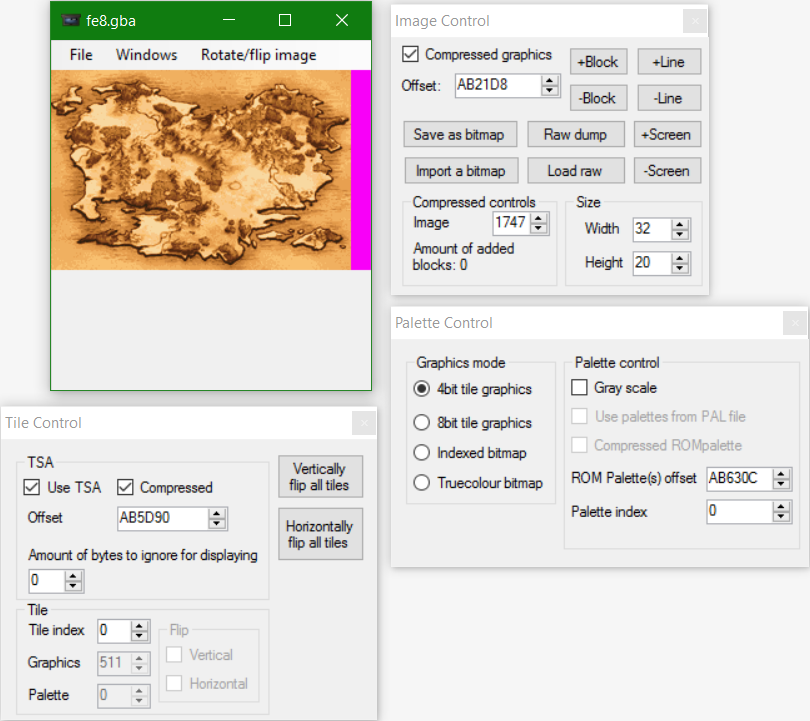
This is one of the world map images in FE8. Once again:
Use TSA - Checked if the image uses TSA.
Compressed - TSA can be compressed, too. More on that later.
Offset - Where the TSA is located.
Amount of bytes to ignore for displaying - Some TSA has extra data at the beginning.
Vertically/Horizontally flip all tiles - flips image by tiles.
Tile index - Which tile position is currently being edited.
Graphics - Which tile is being placed at that position.
Palette - Images with TSA can use multiple palettes, and each tile can select one to use.
Flip - In addition, tiles can be flipped individually.
Notice that the Graphics, Palette, and Flips cannot be edited here. This is because the Compressed box is checked. Also note that clicking on the image in the main window will move the tile index to the tile you've selected.
Also note that I changed the width of the image. This world map, for example, isn't a 32x32 tile square. In fact, it is 32x20 tiles, which equates to 256x160 pixels, or two tiles wider than the GBA screen but just as tall. The extra tiles are not displayed. When viewing TSA, you may need to adjust the number of tiles shown.
If you need to raw dump your TSA, take the offset and put it in the Image Control window to see it as image data. Then you can raw dump like any other data.
Congratulations! You're ready to use GBAGE!
Last updated
Was this helpful?